Business Systems Support

88 posts

Email’s High Risk Threat

Protecting from cyberthreats requires strong layered security

Email filtering technology is one of the layers many businesses neglect. Email protection as part of your overall security services reduce vulnerable to targeted email attacks that can potentially cause damage to multiple applications in your networks. 

Email is the #1 attack vector used by cybercriminals

One wrong click can bring down an entire network and the business depending on that network. Deploying powerful, professional-grade email filtering technology can help reduce the risk of cyberattacks and ensure greater uptime and business continuity.

Mitigate risk with strong email security built for your business

It’s important to assess your risks and implement email security with the right combination of security layers, such as web protection, patch management, firewall management, strong password management tools, and endpoint protection—including a solid backup solution. 

Cloud-based applications still need specialized protection

Many business folks question why they need extra security when using cloud solutions like Microsoft 365 or G Suite, assuming cloud-based solutions and collaboration tools take care of all their security and data retention needs for them. While they are generally secure and constantly improving their security technology, nothing is perfect. These industry giants provide key targets for cybercriminals. Recently, the U.S. Federal Bureau of Investigation issued a warning of hackers targeting Microsoft 365 accounts and Google Suite with business email compromise attacks. A layered security approach with reliable security solutions deployed in your business can make the difference between losing business due to a data breach or winning new business due to having a reputation for trust and protection. 

Sources

1 – “2019 Data Breach Investigations Report,” by Verizon @ https://enterprise.verizon.com/resources/reports/2019-data-breach-investigations-report-emea.pdf (Accessed September 2020).

2 – “Watch out for Office 365 and G Suite scams, FBI warns businesses,” Naked Security by Sophos @ https://nakedsecurity.sophos.com/2020/03/10/watch-out-for-office-365-and-g-suite-scams-fbi-warns-businesses/ (Accessed September 2020).

Reduce Windows 10 Updates’ Effect on Local Network Traffic

Several versions of Windows 10 exist in the wild, each with their own Windows Update nuances. But, all of them can negatively impact network traffic. Windows Update on your computer, in its default state, both constantly downloads and uploads bits of data to build installation packages for both your computer and other computers. Microsoft remarkably leverages the computing resources of millions of Windows 10 computers to distribute monthly updates. However, controlling Windows Update downloads and uploads minimizes their impact to your network.

The next few screenshots detail how you can reign in Windows Update. Please understand that these configuration changes require administrative permission. You will need an administrator user password if you operate under Microsoft’s best practice of a standard user account security profile.

Select “Settings” then “Update & Security”

clip_image002

clip_image004

Select “Windows Update” on the left and then select “Advanced options” under “Update settings”

clip_image006

If you use other Microsoft products like Office 2016 or 365, check the box next to “Give me updates for other Microsoft products when I update Windows.”

clip_image008

For older Windows 10 versions, selecting “Current Branch for Business” under “Choose when updates are installed” means your Windows 10 QuickBooks computer will get only updates “ready for wide spread use in businesses” postponing updates until they get more fully vetted.

clip_image010

In newer versions, the required configuration label selection changed to “Semi-Annual Channel.”

clip_image012

Newest versions of Windows 10 remove the configuration to “Choose when updates are installed” but retain the “Delivery Optimization” configuration link.

Scroll down the page and select “Delivery Optimization;” the older screen in the first image, the newer screen in the second image.

clip_image014

clip_image016

Turn on “Allow downloads from other PCs” and then select “PCs on my local network” to share the Windows Update data download task among several local computers. Then, select “Advanced Options.”

clip_image018

Limit “Download settings” to 5% to reduce inbound network traffic. Limit Upload settings to 5% and 5GB to prevent your computer from sending updates to other computers on the Internet.

clip_image020

When curiosity gets the best of you, check the “Activity monitor” from the “Delivery Optimization” screen for some interesting viewing.

clip_image022

clip_image024

Windows 7 Fresh Install

Win7Believe me, if you are here, it’s because you know completing a fresh installation of Windows 7 can be a real challenge lately.

These steps solved my Windows 7 fresh install problem.

I hope you have the same success.

Complete a fresh Windows 7 Pro SP1 install on a new or re-formatted drive from USB or DVD install media.

Do not put in Windows product key to verify untll the last step

Turn off Windows update from control panel gui.

Update Internet Explorer to IE11 by direct download at http://go.microsoft.com/fwlink/?LinkId=324628

Complete “Fix Windows Update errors by using the DISM or System Update Readiness tool” at https://support.microsoft.com/en-us/kb/947821

Complete “April 2015 servicing stack update for Windows 7 x64-based Systems (KB3020369)” at https://www.microsoft.com/en-us/download/confirmation.aspx?id=46817

Complete “July 2016 update rollup for Windows 7 SP1” at https://support.microsoft.com/en-us/kb/3172605 file named Windows6.1-KB3172605-x64 for 64 bit Windows 7

Turn Windows update back on.

Check Windows Updates and behold, it identifies, downloads and installs over 200 updates!

Verify Windows with a valid product key


New Ring-Scape Features

Make calling easier and more efficient with Ring-ScapeIf you use Ring-Scape, you will enjoy it’s new features installed during the latest 07/20/2016 automatic updates to 3.0 version 3.0.53.

Call Transfer: With this feature, a Ring-Scape 3.0 user can answer a call, and use the new transfer capabilities to quickly and efficiently transfer a call to another user. Both blind and consultative transfer are supported. This capability is available on most desk phones sold by me.

Call transfer can be executed via the new call transfer button on the top menu of Ring-Scape, or via the right mouse button drop down menu in receptionist view.

Call Monitoring: With this feature, a user can select the extensions that they want to monitor. Calls to monitored extensions will flash a different shade of blue in receptionist view, or display as a notification at the top of the screen. Monitored calls can be picked up by a simple click of the mouse.

Tel protocol support: The Telephone Link Protocol or Tel protocol provides the capability for a user to setup a link in a website, or a document that allows a call to be placed via a telephony application such as Ring-Scape. A Ring-Scape user can easily choose to associate their Ring-Scape application as the application to use when clicking on a link that uses the Tel protocol. This is done by setting the association to the protocol in the Ring-Scape Settings > General tab window.

Learn more about Ring-Scape 

Contact me about Hosted PBX phone systems with Ring-Scape.

Windows 10 File History Multiple Drives Backup Hack for Disaster Recovery

File to file backup software for Windows 10 computers appear to be few and far between as well as expensive when loaded up with features one may never need. Windows 10 File History Backup was not designed as a backup in the sense of restoring data to another computer after a computer failure. However, this Windows 10 File History Backup hack, fully supported by Microsoft, gives us folks that do not want to use pricey Internet backup or expensive backup software a viable option for emergency file recovery.

Download a PDF of Windows 10 File History File to File Backup Hack for Disaster Recovery

Windows 10 File History Backup is designed to grab earlier versions of files after one realizes they deleted a file or damaged a file in some way. Restoring a file or files is straight forward as shown below.

Select “Restore files from a current backup”

clip_image002

Then, select the folder or file(s) you need and select “Restore to original location”

clip_image004

This hack shows that Windows 10 File History Backup can also be used to recover data to another computer in an emergency. The following series of screen shots detail how this can be done.

Insert a large USB drive for use as a backup drive

clip_image006

Select “Settings”

clip_image008

Select “Update and Security”

clip_image010

Select “Backup”

clip_image012

Select “Add a drive”

clip_image014

Select your USB drive

clip_image016

Select “More options”

clip_image018

Select the timing you need under “Back up my files”

clip_image020

Select “Until space is needed” under “Keep my backups.

clip_image022

One can add or remove folders under “Back up these folders.

clip_image024

To start a backup, select “Back up now”

clip_image026

If the backup up application does not auto close, click the “X” in the top right corner

clip_image028

The backup will complete in the background. The more files you have, the longer the back will take to complete. Check status of backup by looking at “Last backup:” date and time under “Overview”

One can manually trigger a backup anytime by selecting “Back up now” on the Back up options screen as well as learning the date and time of the last backup and space available on the drive.

One can rotate multiple drives for an extra level of protection. Generally, Windows 10 File History Backup using multiple drives works by formatting a previously used drive and starting the backup process over with the newly formatted drive. One should carefully follow these instructions.

1 – Start with two external USB drives. Label them Backup One and Backup Two.

2 – Insert Backup One and format the drive using the right click contextual menu in File Explorer. Then set it up as a file history drive using the instructions above starting at “This hack shows that Windows 10 File History Backup can also be used to recover data to another computer in an emergency.”

3 – Determine a backup drive rotation that works for you. Consider how out of sync you might be if you lost your laptop and your stored backup last completed several weeks ago. I prefer to be no more than a week behind but you may think differently. So, for this example, I will pick one week.

4 – After one week, check your Backup One drive for the current backup process to be complete on the “Backup options” screen. You might also want to reconcile several random files before you remove the drive.

5 – Select “Stop Using Drive” also on the “Backup options” screen and then remove the drive and place it in another location far from your laptop; your home safe works well.

6 – Insert the Backup Two drive and complete a drive format like in Step 2 above.

7 – Set up the Backup Two drive as a file history drive using the instructions above starting at “This hack shows that Windows 10 File History Backup can also be used to recover data to another computer in an emergency.”

8 – After one week, check your Backup Two drive for the current backup process to be complete. You might also want to reconcile several random files before you remove the drive.

9 – Select “Stop Using Drive” and then remove the drive and place it in another location far from your laptop; your home safe works well.

10- Insert the Backup One drive and complete a drive format.

11 – Set up the Backup One drive as a file history drive using the instructions above starting at “This hack shows that Windows 10 File History Backup can also be used to recover data to another computer in an emergency.”

12 – Then off you go again with another fresh backup drive. Repeat this process every week alternating between Drive One and Drive Two.

Now, if you lose your computer from some unfortunate circumstance, find the latest Backup One or Backup Two USB drive and plug it into another computer.

You can easily restore files and their many older versions to another computer by browsing the drive’s “File History” folder for needed files and copying them to your new computer.

It can be confusing because of many multiples of time stamped files with the same name. But, cut through the confusion by paying close attention to the time stamp appended to the file name, restoring only the most current file. In most cases, rarely changed files will only have one file with no versions in the file history folder.

clip_image030

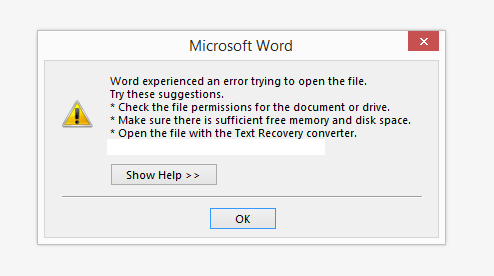
However, DO NOT use the “Restore files from a current backup” function on the “Backup Options” screen to restore files to another fresh Windows 10 computer and new user profile. As easy and intuitive as it looks to restore, it does not work. You will get an error message.

clip_image032

clip_image034

clip_image036

clip_image038

Remember, the proper way to restore your files to a another computer in the event of a disaster is by browsing the drive’s “File History” folder for needed files and copying them to your new computer.

Word Experienced An Error Trying To Open The File

Seems odd that you cannot open a shared file on the network?

Double click a Word or Excel document on a shared drive and you get “Word Experienced An Error Trying To Open The File.” The fix is below the picture.


word_ error

File –> Options –> Trust Center –> Trust Center Settings… –> Protected View –> Uncheck Enable Protected View for files originating from the Internet and uncheck Enable Protected View for Outlook attachments –> OK –> OK.

Security can be a pain.

Google Apps Account Access Temporarily Disabled

More than 22.7 million U.S. businesses are one-man or one-woman shows. Each of these tiny firms has a single owner, but no paid employees at all. The US government calls these businesses “Nonemployer” businesses.

If you are one of those 22.7 million U.S. businesses, you probably know about Google Apps for Work, the professional email, online storage, shared calendars, video meetings, voice telephone service and more, built for business, by Google.

More than 5 million businesses have gone Google. You may be a Google Apps for Work single user and account holder. If so, you need to know about Google’s account access problem.

You may have experienced or will experience in the future the dreaded “Account access temporarily disabled” message when you log in to your Google Apps for Work account. Imagine your business’ risk if you depend on all of Google Apps for Work’s services including business telephone service and you find your Google Apps for Work account arbitrarily disabled. You can be out of business in the blink of an eye.

Google’s account access problem lies in it’s “catch 22” process to re enable your account, should you find yourself out of business. It goes like this;

Upon attempting to log on to your Google account, you get Google’s version of the “Blue Screen of Death”

Account access temporarily disabled

Since you are the only administrator, you seek the “24/7 phone and email support,” that you pay $5 to $10 a month for, from the “Google Support team”

Google Support team

Google Support team contact

Unfortunately, you cannot email support because you cannot access the “Admin Console.” But, you would want to call the “Google Support team” anyway because of the urgency to re enable your Google account. So you go about the business of locating your PIN because the “Google Support team” requires your PIN in order for them to answer their telephone. But, you see a page that states, “To locate your PIN: Sign in to the Google Admin console.”

Support PIN

So now, you’re stuck. You cannot call or email the “Google Support team” without access to your disabled Google account for their email link or PIN. That’s some strange paid “24/7 phone and email support.”

Fortunately, when Google’s account access problem happened to me, I located an obscure form at https://support.google.com/a/contact/admin_no_access that opened a support ticket. Unfortunately, 48 hours into the support request, my Google Apps for Work remains disabled.

Let me be the first to say that I like Google Apps for Work’s features and general performance. I especially like the ability to wipe a lost smartphone. I also like using Google Voice for calls using a computer headset. I’m not a Google Apps for Work reseller, but I have set up many businesses with Google Apps for Work.

But, single user Google Apps for Work accounts require a different approach. What can one do to protect one’s self from Google’s lackluster Google Apps for Work support?

  • Google Apps for Work “Nonemployer” business folks should always have two admin users in their account, with strong passwords and be well documented. The second admin user can be used to re enable the primary admin user when that user experiences “Account access temporarily disabled.”
  • Never use a Google Voice number as your primary business telephone number. If you have done that, immediately port your number out of Google Voice to a more dependable carrier, either a local telco service provider or a national VOIP provider with a demonstrated excellent support track record.
  • Back up your primary user’s email, contacts, calendars, tasks, voice calls, chats, drive and any other data you may have in Google Apps for Work. One can use Outlook sync for manual and limited backup or go the distance with backupify, the leader in Google Apps backup.

Have you been stunned by the dreaded “Account access temporarily disabled” message? If so, what was your experience?

Update 11.26.2014: The account was re enabled at 5:30am, four days after the initial disabling. Once I correct the DNS workaround that will flow my email back into the account, if will be an entire week down, a service level that I would understand for free services, but not a paid business service. Also, my android phone was rendered useless during the process because the policy app on the phone. I’m certainly glad that this was not a business related account. When a “Nonemployer” business person needs paid “24/7 phone and email support,” they deserve not to wait a week. My conclusion, I will seriously reevaluate Google Apps for Work for my businesses and will not recommend Google Apps for Work to any other “Nonemployer” business person.

Difference Between Office 2013 Suites and Office 365

2013mohbI get this question about the difference between the Office 2013 suites and Office 365 more than any other question. The main two differences have to do with “the cloud” and your ownership.

Microsoft Office is still the name Microsoft uses for its familiar productivity software. Office suites have traditionally included applications such as Word, Excel, PowerPoint, and Outlook. All Office 2013 suites include the latest versions of the applications, for use on a single PC.

Microsoft uses the name “Office 365” for products that include cloud services, such as additional SkyDrive online storage, Skype minutes for home use, Lync web conferencing or Exchange Online hosted email for businesses. Cloud services are features that are enabled over the Internet.

Some Office 365 plans also include the full-featured Office 2013 applications, which users can install across multiple computers and devices. Some Office 365 plans do not include the full-featured Office 2013 applications. Consequently, one gets stuck with limited "cloud" versions of familiar Office applications like Word and Excel.

All Office 365 products, such as Office 365 Home Premium, are paid for on a subscription basis, annually. Active subscribers will receive future rights to version upgrades as a benefit of their subscription. One pays for Office 365 every year.

Office 2013 suites require a one time payment. After payment, one owns the license to an Office 2013 product in perpetuity; in other words, forever.

I still use Office 2002, a product I paid under a hundred dollars to acquire, on some of the computers I own. But my standard, Office 2007 that I purchased one time in 2008, gets all my work done without any issues.

So, pay one time and own forever a Microsoft Office suite, preferably on DVD; or pay forever for Microsoft Office 365 adding a bit of cloud stuff, most of which one can get free already.

Move To A New QuickBooks Server

contactI recently responded to a request about using a Mac as a server. It got me to thinking about two things; how much I like Macs and how I move client’s QuickBooks to a new QuickBooks server after a hardware upgrade. I hope this information helps you out.

My response:

I also like Macs except when it comes to QuickBooks. You may have picked up on the fact that I always install a full version of QuickBooks on the server; never using Intuit’s “server install only” option for QuickBooks. Consequently, Mac is not an option for me. Intuit allows for a free extra server install in their licensing. I developed my XP Pro server installation as a reasonably inexpensive alternative to hosted QuickBooks, Windows Server operating systems/hardware installs and Apple or Linux installs.

For several years now, I’ve used my own methodology to move QuickBooks from a desktop or old server to a new server. I always use unique folders for each unique group of companies. I evaluate and enumerate the existing company files folder to see what I’m working with. Every company has their own unique mess. Once I’ve figured out the mess, I plan the cut-over date and build the new server including the new folder structure. Just prior to cut-over, I complete a fully verified backup of each company file. I will generally rebuild the company files when they do not verify. On many occasions, especially with large files, the company accountant will need to back out transactions or clean up the data before the file will verify.

Upon cut-over to the new server, I perform a restore from the verified QuickBooks backup file, moving unique companies into their respective new folders. Then, I go back to pick up custom reports, invoices, images, etc in their folders, like “QuickBooks Letter Templates”, “[company file name] – Images”, “Templates” as well as other folders with names relative to past versions. I will also pick up any shipping databases or other third party add on files. Finally, I copy the entire contents of the old company files folder to a unshared location on the server from where I can get anything that might be found missing several days after the cut-over.

Folks have a habit of placing task lists, spreadsheets, pdf docs and other extraneous files in the company files folder. I will copy those over to a shared “Accounting” folder and train users to place any accounting related support documents in that folder. In spite of that, I still see stuff land in the QuickBooks company file folders when I’ve returned weeks or months later.

On a side note, I’ve stopped using “Q” as a mapped drive letter. Microsoft reserved “Q” for their click to run software. Seems that everyone gets Microsoft Office from click to run these days. Consequently, I go to each client computer and map the server shared QuickBooks company files folder to a new drive letter.