QuickBooks

17 posts

QuickBooks Multi User Server Uses Up A License

Question: I recently set up the XP Pro QuickBooks server and have a couple of questions.

The only way for all users to have access to files is to keep QuickBooks open on the server. This, in turn is using up one of my licenses. I have tried the server manager, but it is not allowing users to access the files.

Is this the way it has to be setup? How can I fix this?

Answer: No, this is not the way it has to be set up.  The entire version of QuickBooks should be installed on your server and hosting company files does not require QuickBooks to stay open or use up a user license.

The only time a user license comes into play on the server is when QuickBooks is open and has a company file open on the server for those times that you might be configuring automation or performing file maintenance.

These steps will clear up your installation:

1 – Restart your server then access the server’s desktop.

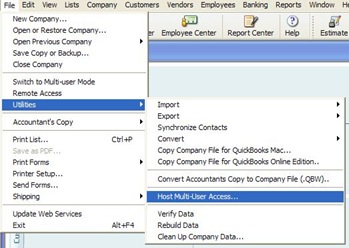
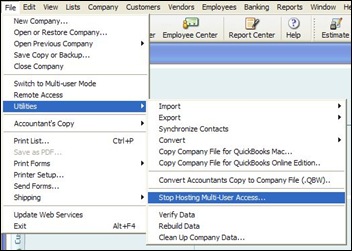
2 – Open QuickBooks with the Admin user and confirm that the server is hosting multi user access. From file, select Utilities. The drop out menu will show "Stop Hosting Multi-User Access…" (see below) The server is the only QuickBooks installation that should show "Stop Hosting Multi-User Access…"

"Stop Hosting Multi-User Access..."

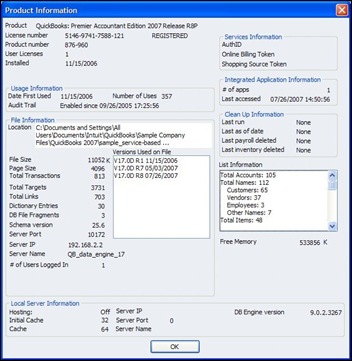
3 – Select the F2 key to pop out the "Product Information" screen (see below). Print the screen or take note of these items. At the top, the "Product" "License Number", "Product number" and "User Licenses" needs to match on each computer that has QuickBooks installed. The "File Information" "Location" needs to be the network location and match on each computer accessing QuickBooks including the server.

F2 Product Info 

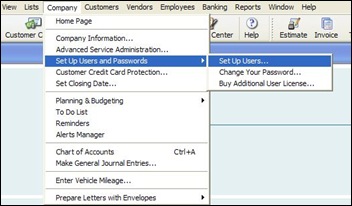
4 – Confirm that you have unique users set up in QuickBooks. Select "Company" then "Set Up Users And Passwords" then "Set Up Users…" (see below) Every unique logon to QuickBooks requires a unique user.

"Set Up Users And Passwords" 

5 – Close QuickBooks on the server

6 – Open QuickBooks on each client computer confirm that the server is hosting multi user access. From file, select Utilities. The drop out menu will show "Host Multi-User Access…" (see below)

"Host Multi-User Access..." 

7 – On each client computer, select the F2 key to pop out the "Product Information" screen and confirm that each item in step 3 matches.

Update your clients to the latest version if the "Product" does not match. Contact QuickBooks support if the "License Number", "Product number" and "User Licenses" do not match. Browse to open company files from the correct network location if  "File Information" "Location" does not match.

8 – Confirm that no firewall software is turned on or running on either the server or any of the clients. Firewalls belong on your Internet gateway device, not on your business desktop computer. If you use a laptop, you need to learn how to disable and enable the firewall software.

Download QuickBooks 2010, Try Without Hurting Current QuickBooks Company Files

Today is the QuickBooks 2010 release date.

You will most certainly want to upgrade from your present version of QuickBooks to QuickBooks 2010. There are many New Features in QuickBooks 2010. My favorite new feature; “Scan documents directly into QuickBooks and attach them electronically to QuickBooks transactions”

However, please don’t endanger your current production QuickBooks. Try out QuickBooks 2010 without messing up your production quickbooks using one of several ways.

First, download the QuickBooks Solutions For Your Industry or, you can Save 20% off QuickBooks Pro Small Business Accounting Software + Free Shipping

Next, if you plan to buy a new computer in the next several months, purchase a new PC that is upgradable to Windows 7 Pro or Ultimate. Purchase QuickBooks 2010, install it on your new PC. Restore one of your company files on your new PC and start experimenting.

Use this combination as a tool to help you plan your upgrade after the first QuickBooks 2010 updates come out in several months. Then, in several months, install your clean version of Windows 7 on the new PC and move it into production.

Another great way to test QuickBooks 2010 without purchasing a new PC requires installing Microsoft Virtual PC 2007 to your current XP or Vista PC. Virtual PC 2007 allows you to create a virtual computer inside of your present computer. Follow the Virtual PC 2007 instructions, install Windows XP, Vista or 7 on your virtual computer. Install QuickBooks 2010 on your virtual computer.

Then get with the program; learn about QuickBooks 2010 and create your upgrade plan.

QuickBooks Multi User With Windows 7

If you plan to run out and buy a new Windows 7 computer at the end of October, I’m sure you’ve done the research to know that only QuickBooks 2010 is supported on Windows 7; and that there are problems with QuickBooks Pro 2009 on Windows 7

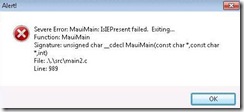
error 

Don’t throw away your old Windows XP Pro computer yet. First, not only will QuickBooks 2010 install ok on a fresh copy of Windows 7 with Internet Explorer as the default browser, but earlier versions of QuickBooks will also install and run on Windows 7. Second, Windows 7 will see network shares on Windows XP Pro with little effort as opposed to setting up Windows networking with Windows 7 or Vista.

So, using your old Windows XP Pro computer as a dedicated QuickBooks server makes terrific sense. Put a fresh installation of Windows XP Pro on the computer from a restore CD or Windows XP Pro CD, then follow the instructions at painlessquickbooks.com to build out and configure the server.  All of your valuable QuickBooks company files will be in a safe, secure, out of the way location,  not on a dynamically changing computer used on someone’s desk every day.

You can also configure your dedicated QuickBooks server to complete automated tasks like a backup or syncing your website orders and inventory to QuickBooks.

Temporary QuickBooks Restore

Frequently, folks need to go back a few days to look at the information in QuickBooks prior to making a catastrophic mistake or confirming major changes will not be a catastrophic mistake. Imagine a scenario where you have just completed a total remake of your expense account numbers or made journal entries correcting out of balance accounts.

In these cases, a temporary restore of a several days old backup will fill the bill. And, you certainly don’t want to accidentally over-write you current company file.

Now the film

Are You Ready For QuickBooks Multi User?

Visit painlessquickbooks.com to find out.

QuickBooks Loan Manager

 In case you don’t know, QuickBooks Loan Manager provides a great tool to manage loans. I found out about it quite by accident.

One of my clients required a better way to organize and backup QuickBooks. They work with several QuickBooks company files. So, I restructured the folder hierarchy, configured a seven day QuickBooks staggered backup then integrated it with their tape backup on another server.

During the last step involving checking my work, I discovered that the QuickBooks Loan Manager screen in each company file was blank. After poking around some, I figured out that the QuickBooks Loan Manager files are not included in the QuickBooks Backup (.QBB) file.

Typically, I backup the entire folder that contains the company files. So, I returned to the backup and then I copied the old .lmr file into the new location for company files, returning the loan manager to full functionality.

The lesson here, backup your entire company files folder. Several components will not restore properly if you use only the .QBB file. I learned about QuickBooks Loan Manager today. I learned about QuickBooks Shipping Manager some time ago.

Are You Ready For QuickBooks Multi User?

Visit painlessquickbooks.com to find out.

QuickBooks Backup Fully Automated

I’ve seen a lot of pain lately. The latest, a small company assuming their nightly backup was working correctly, until they found out the hard way. It seems to me that loss of business data always involves QuickBooks, so I created a short film instructing users on automating their backups.

This process keeps seven days of company files available for recovery in an online location, out of your building. Seven days helps to alleviate the problem of catastrophic data entry errors, allowing a business to revert back to a previous day’s company files.  

As I’ve repeatedly said, test your backup at least once a month. Do a complete trial recovery. If you don’t know how to do that, contact me. I can use the work.

Now the film.

Are You Ready For QuickBooks Multi User?

Visit painlessquickbooks.com to find out.

QuickBooks Shipping Manager Networked

Looks like your shipping manager information is spread across several computers? Follow these instructions to network QuickBooks Shipping Manager for multi-user fuctionality.

Determine which QuickBooks computer contains the best shipping manager information. It may be on the main QuickBooks computer or the QuickBooks computer in the warehouse.

Locate the shipping manager database in a hidden folder named “Shipping Manager” at

C:\Documents and Settings\[username]\Application Data\Intuit\ShippingManager\

Copy the folder named “Shipping Manager” then paste into the shared company files folder.

The path to your shared company files folder should be

“\\[host ip address]\[shared company files folder]\

Go to the QuickBooks computer that contains your hosted company files. In QuickBooks, go to the File menu, click Shipping, then click UPS or FedEx Shipping Options then Settings. You may have to set up “Shipping Manager” from scratch if you have not done so yet. Select “Connection Settings” on the left side of the “Shipping Manager Settings” window. In the “Shipping Manager Database Location” block, type the path to the database;

\\[host ip address]\[shared company files folder]\ShippingManager\Shipping Manager v4\Database.v4

Configure the “Shipping Manager Settings” on each workstation the same way. In the “Shipping Manager Database Location” block, type the path to the database;

\\[host ip address]\[shared company files folder]\ShippingManager\Shipping Manager v4\Database.v4

Now, all QuickBooks workstations should be using the same shared Shipping Manager database.

If your QuickBooks resides on a Terminal Services server, configure each user to access the Shipping Manager Database from the same location; typically, the QuickBooks data folder

[data drive]:\[QuickBooks Data Folder]\ShippingManager\Shipping Manager v4\Database.v4

Are You Ready For QuickBooks Multi User?

Visit painlessquickbooks.com to find out.